腾讯云TencentOS Server 3.1(TK4)手动搭建 LNMP 环境
LNMP环境是在 Linux 系统下,搭建Nginx + MySQL/MariaDB + PHP的网站服务器架构。
当您进行手动搭建 LNMP 环境时,需要熟悉 Linux 命令,并对所安装软件的使用及版本兼容性比较了解(爱折腾)。
如果嫌麻烦,可以使用腾讯云市场中提供了例如包含多种操作系统、热门软件等不同类型的镜像,或者宝塔面板,快捷方便。
Linux:Linux 操作系统,本文以TencentOS Server 3.1(TK4) 为例,同样适用于CentOS 8.0 。
Nginx:Web 服务器Nginx 1.20.0
MySQL/MariaDB数据库:MySQL 8.0 / MariaDB 10.3(二选一)
PHP:脚本语言PHP 7.2
我为什么选用TencentOS Server
CentOS 官方计划停止维护 CentOS Linux 项目,并于2022年01月01日停止对 CentOS 8的维护支持。
CentOS 7于2024年06月30日也将停止维护,详情请参见 CentOS 官方公告。
腾讯云暂时不会下架 CentOS 8系列的镜像,但会停止更新 CentOS 8系列镜像以及 OS 软件版本。
腾讯云官方也给出了CentOS 迁移 TencentOS的方案。
如果正在使用 CentOS,建议尽快迁移到 TencentOS 对应版本
CentOS 7系列建议迁移至 TencentOS Server 2.4 (TK4)。
CentOS 8系列建议迁移至 TencentOS Server 3.1 (TK4)。
具体迁移操作请参见 CentOS 迁移 TencentOS 指引。
操作步骤
当我们购买了腾讯云Linux云服务器之后,TencentOS Server 3.1 (TK4)系统会自动安装运行。
步骤一:登录 Linux云服务器
你也可以根据实际操作习惯,选择其他不同的登录方式:腾讯云WebShell、Xshell、PuTTY等。
在安装软件之前,我们要必要升级所有包。
yum有两个参数升级指令,update和upgrade,区别如下:
1、升级所有包同时,也升级软件和系统内核;
yum update
2、只升级所有包,不升级软件和系统内核,软件和内核保持原样。
yum upgrade
步骤二:安装配置 Nginx
说明:本文以安装 Nginx 1.20.0 为例,您可通过 Nginx 官方获取更多版本的安装包。
1、安装 Nginx。
dnf -y install http://nginx.org/packages/centos/8/x86_64/RPMS/nginx-1.20.0-1.el8.ngx.x86_64.rpm
2、查看 Nginx 版本。
nginx -v
返回类似如下结果,则表明已成功安装。
nginx version: nginx/1.20.0
3、查看 Nginx 配置文件路径。
cat /etc/nginx/nginx.conf
可查看 include 配置项的 /etc/nginx/conf.d/*.conf 即为 Nginx 配置文件的默认路径。
4、在配置文件默认路径下进行备份,依次执行以下命令。
cd /etc/nginx/conf.d
cp default.conf default.conf.bak
5、打开 default.conf 文件。
vim default.conf
6、按 i 切换至编辑模式,编辑 default.conf 文件。
找到 server{...},并将 server 大括号中相应的配置信息替换为如下内容。
用于取消对 IPv6 地址的监听,同时配置 Nginx,实现与 PHP 的联动。
在 location 的 index 项中添加 index.php。
server {
listen 80;
server_name locahost;
root /usr/share/nginx/html;
location / {
index index.php index.html index.htm;
}
location ~ .php$ {
root /usr/share/nginx/html;
fastcgi_pass 127.0.0.1:9000;
fastcgi_index index.php;
fastcgi_param SCRIPT_FILENAME $document_root$fastcgi_script_name;
include fastcgi_params;
}
error_page 404 /404.html;
location = /40x.html {
}
error_page 500 502 503 504 /50x.html;
location = /50x.html {
}
}
编辑完成之后,按Esc键,然后输入:wq并回车以保存并关闭配置文件。
7、启动 Nginx,设置 Nginx 为开机自启动。
systemctl start nginx
systemctl enable nginx
8、Nginx验证方法
在浏览器中访问云服务器实例的公网IP地址,查看 Nginx 服务是否正常运行。
如:http://<云服务器实例的公网IP地址>/
显示如下图,Welcome to nginx,则说明Nginx安装配置成功。
步骤三:安装配置数据库(二选一)
1、安装MariaDB
①、执行以下命令,查看系统中是否已安装 MariaDB。
rpm -qa | grep -i mariadb
返回结果已存在 MariaDB。
请执行以下命令移除已安装的 MariaDB。
yum -y remove 包名
②、执行以下命令,在 /etc/yum.repos.d/ 下创建 MariaDB.repo 文件。
vi /etc/yum.repos.d/MariaDB.repo
③、按 i 切换至编辑模式,写入以下内容,添加 MariaDB 软件库。
腾讯云镜像源同步 MariaDB 官网源进行更新,可能会出现 MariaDB 10.8 版本源失效问题。
可前往 MariaDB 官网 获取其他版本及操作系统的 MariaDB 软件库安装信息,官方的访问速度有可能会慢一些。
以下是阿里云的镜像源(CentOS 7、8版本自己修改以下红色参数):
# MariaDB 10.8 CentOS repository list - created 2022-06-03 13:12 UTC
# https://mariadb.org/download/
[mariadb]
name = MariaDB
baseurl = https://mirrors.aliyun.com/mariadb/yum/10.8/centos8-amd64
module_hotfixes=1
gpgkey=https://mirrors.aliyun.com/mariadb/yum/RPM-GPG-KEY-MariaDB
gpgcheck=1
④、按 Esc,输入 :wq,保存文件并返回。
执行以下命令,安装 MariaDB。此步骤耗时较长,请关注安装进度,等待安装完毕。
yum -y install MariaDB-client MariaDB-server
⑤、执行以下命令,启动 MariaDB 服务和设置 MariaDB 为开机自启动。
systemctl start mariadb
systemctl enable mariadb
⑥、执行以下命令,验证 MariaDB 是否安装成功。
mysql
显示结果如下,则成功安装。
执行 \q 或者 exit 命令,退出 MariaDB。
⑦、初始化root密码,配置数据库安全选项(以下三条命令,只需要执行一条,万一a出错,用b、实在不行c)
a、mysql_secure_installation
b、mariadb_secure_installation
c、mariadb-secure-installation
在此省略了很多,#号后面有中文备注,请自行参考,我是一路全选Y
Enter current password for root (enter for none): #初次配置无密码可直接回车,有密码输入密码回车OK,
successfully used password, moving on...Set root password? [Y/n] y #是否设置 root 用户密码,输入 y 并回车或直接回车
New password: #设置 root 用户的密码Re-enter new password: #再输入一次你设置的密码
... Success!
Remove anonymous users? [Y/n] y #是否删除匿名用户, 生产环境建议删除
... Success!
Disallow root login remotely? [Y/n] y #是否禁止 root 远程登录, 根据自己的需求选择 Y/n 并回车, 建议禁止。
... Success!
Remove test database and access to it? [Y/n] #是否删除 test 数据库, 直接回车
Reload privilege tables now? [Y/n] #是否重新加载权限表,直接回车
... Success!
Thanks for using MariaDB! #最后看到这个提示说明已经配置成功
⑧、启动MariaDB,设置 MariaDB 为开机自启动。
systemctl start mariadb
systemctl enable mariadb
⑨、初始化MariaDB完成,接下来测试登录,通过命令行登录:
mysql -uroot -p
Enter password: 这里输入密码
Welcome to the MariaDB monitor. Commands end with ; or \g.
Your MariaDB connection id is 2
Server version: 5.5.65-MariaDB MariaDB Server
Copyright (c) 2000, 2018, Oracle, MariaDB Corporation Ab and others.
Type 'help;' or '\h' for help. Type '\c' to clear the current input statement.
MariaDB [(none)]>
执行命令:exit 退出。
2、安装配置Mysql
执行安装命令:
dnf -y install @mysql
查看 MySQL 版本。
mysql -V
返回类似如下结果,则表明已安装成功。
mysql Ver 8.0.21 for Linux on x86_64 (Source distribution)
启动 MySQL 并设置为开机自启动,依次执行以下命令。
systemctl enable --now mysqld
systemctl status mysqld
执行 MySQL 安全性操作并设置密码。
mysql_secure_installation
按照以下步骤,执行对应操作:
输入 y 并按 Enter 开始相关配置。
选择密码验证策略强度,建议选择高强度的密码验证策略。输入 2 并按 Enter。
0:表示低。
1:表示中。
2:表示高。
设置 MySQL 密码并按 Enter ,输入密码默认不显示。
再次输入密码并按 Enter,输入 y 确认设置该密码。
输入 y 并按 Enter,移除匿名用户。
设置是否禁止远程连接 MySQL:
禁止远程连接:输入 y 并按 Enter。
允许远程连接:输入 n 并按 Enter。
输入 y 并按 Enter,删除 test 库及对 test 库的访问权限。
输入 y 并按 Enter,重新加载授权表。
步骤四:安装及配置 PHP
https://mirror.webtatic.com/yum/el7/epel-release.rpm #添加第三方 yum 包
rpm -Uvh https://mirror.webtatic.com/yum/el7/webtatic-release.rpm #添加第三方 yum 包的 webtatic 库
2、yum list php72* #查看 php 可用安装版本包
yum install php72w php72w-opcache php72w-xml php72w-mcrypt php72w-gd php72w-devel php72w-mysqlnd php72w-intl php72w-mbstring php72w-pear php72w-pdo php72w-fpm #安装 php7.2.xx 及插件
这里省略很多安装过程,此步骤耗时较长,请关注安装进度,等待安装完毕。
此处如果PHP7.2编译No package php72w-mcrypt available.错误,请使用如下解决
yum install epel-release //扩展包更新包
yum update //更新yum源
yum install libmcrypt libmcrypt-devel mcrypt mhash
3、查看已安装的 php 版本
php -v
至此,LNMP环境配置完成,接下来我们验证LNMP环境是否搭建成功。
4、创建测试文件phpinfo.php,用于展示PHP信息。
echo "<?php phpinfo(); ?>" >> /usr/share/nginx/html/phpinfo.php
本文配置的网站根目录为/usr/share/nginx/html。
5、启动 PHP-FPM 服务。
systemctl start php-fpm
6、设置 PHP-FPM 服务为开机自启动。
systemctl enable php-fpm
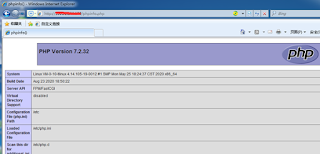
7、打开浏览器在地址栏输入http://<云服务器cvm实例公网ip地址>/phpinfo.php
最后,腾讯云TencentOS Server 3.1(TK4)手动搭建 LNMP环境(Linux+Nginx+MySQL/MariaDB+PHP)完成了。
如果使用腾讯云提供的数据库管理,可自行开启数据库的远程连接,添加数据库。
Nginx 配置文件的默认路径:/etc/nginx/conf.d/*.conf
网站根目录为:/usr/share/nginx/html


评论
发表评论